Quote
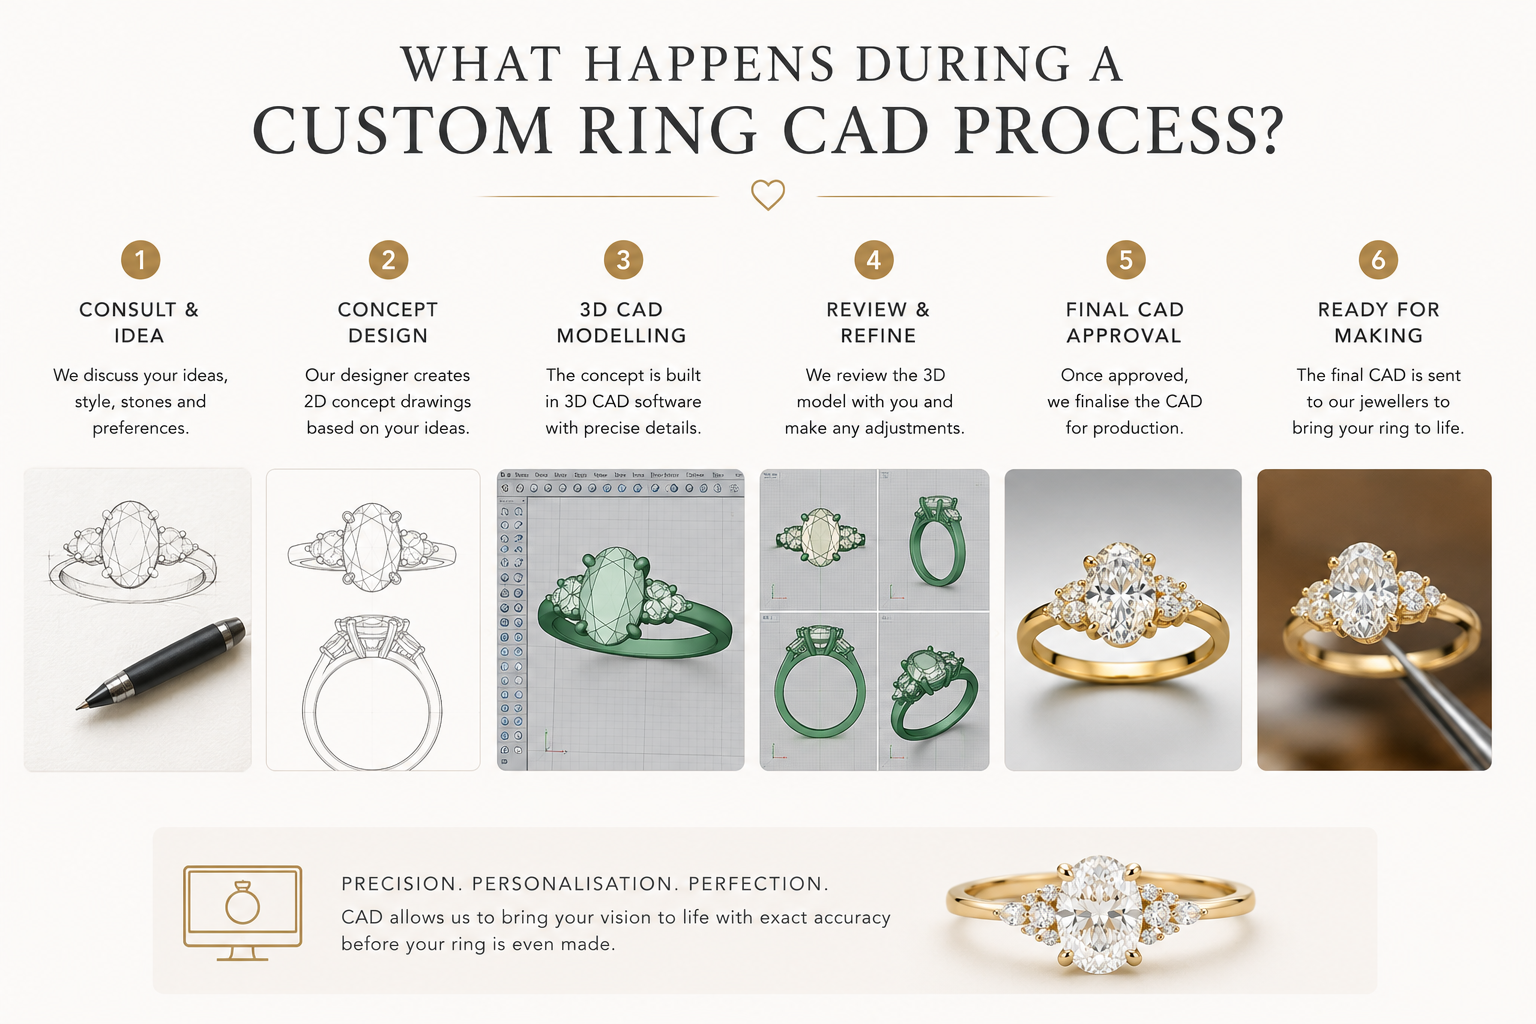
What Happens During a Custom Ring Cad Process
A custom ring CAD process turns your approved design direction into a technical digital model that can be checked before the ring is made. CAD is where proportions, stone sizes, setting height, band width, prong placement and design balance are tested visually and technically. It is not the finished ring, and it cannot show every real-life detail such as final polish, exact gemstone personality or the full play of light, but it gives you and the jeweller a clear model to review before production begins.
What CAD Means in a Custom Ring Project
During a custom ring CAD process, your chosen design direction is converted into a digital jewellery model with measured parts. This includes the ring size, band width, centre stone dimensions, setting height, prong positions, side stone layout and decorative details. The purpose is to resolve the design before metal is cast or finished, so the ring can be checked for balance, wearability and manufacturing practicality.
It translates an idea into measured form
A sketch, reference image or consultation brief becomes a digital model with real dimensions. CAD helps confirm whether the requested design can physically work with the selected stone and finger size.
It shows structure before production
The model allows you to review the ring from different angles, including top view, side profile and setting height, before the piece moves into manufacturing.
It supports informed approval
You are not approving a vague concept. You are approving the main proportions, layout and construction direction, while understanding that the final ring will still depend on metal finishing, stone setting and handwork.
How CAD Shows the Visual Personality of the Ring
CAD helps you understand the personality of a custom ring by showing scale, silhouette and layout. It can make a delicate design look more substantial on screen because renders are enlarged, and it can make tiny details appear more visible than they will be on the hand. A good CAD review looks beyond the attractive render and asks whether the design will have the intended presence in real life.
Top view shows the face of the design
The top view helps you evaluate the outline, stone coverage, halo shape, shoulder detail and whether the centre stone feels dominant enough for the design.
Side view shows height and profile
The side profile reveals how high the centre stone sits, whether a wedding band may fit beside it and how visible the basket or gallery will be when worn.
Scale needs real-world interpretation
A CAD render may be viewed far larger than the finished ring. Millimetre measurements are more reliable than judging only from a close-up render.
Proportions, Stone Sizes and Ring Balance
One of the most important parts of CAD is checking proportion. The same carat weight can look very different depending on measurements, finger size and setting style. CAD is used to position the centre stone, balance the band, adjust side stones and ensure that decorative elements support the ring rather than overcrowd it.
Centre stone dimensions drive the model
The CAD should be based on the actual stone measurements wherever possible. A 1.00 carat stone can vary in visible spread, so millimetres matter more than carat weight alone.
Length-to-width ratio changes the look
For shapes such as a pear or teardrop, the length-to-width ratio affects whether the stone appears fuller, slimmer, softer or more elongated. CAD helps test how that outline sits in the design.
Band width affects perceived size
A narrower band can make the centre stone look larger, while a wider band can create a stronger architectural feel. CAD helps find a practical balance between delicacy and strength.
Side stones must be scaled carefully
Side stones that look subtle in a reference image can overpower the centre stone if scaled incorrectly. CAD lets the jeweller adjust size and spacing before production.
What CAD Can and Cannot Show About Brilliance
CAD can show where a stone sits, how much of it is visible and whether metal may block parts of the stone, but it cannot fully predict real diamond sparkle. Brilliance, fire and scintillation depend on the actual diamond or gemstone, its cut quality, lighting conditions and how it is set. CAD should be treated as a design and construction preview, not a final light performance report.
CAD shows placement, not true sparkle
A render may use artificial lighting and simulated reflections. It can look bright even when the real stone has different optical behaviour.
Bow-tie visibility must be checked on the stone
In elongated shapes such as pear stones, a bow-tie may be more or less visible depending on the individual cut. CAD cannot replace photos, videos or in-person stone assessment.
Metal can influence perceived brightness
Prong placement, bezel edges and halo spacing can affect how open the stone appears. CAD helps identify if the setting may visually crowd the stone.
CAD Approval Should Include Durability, Not Only Appearance
A custom ring can look elegant in CAD but still need practical adjustments for daily wear. Very fine claws, overly thin bands, exposed edges, high settings or unsupported decorative details may be vulnerable over time. The CAD stage is the right time to ask whether the design has enough metal in key areas, whether the centre stone is protected, and whether the ring can handle realistic engagement ring wear.
How Settings Are Refined During CAD
The CAD model is where the setting style becomes specific. A claw setting, bezel setting, halo, hidden halo, cathedral shoulder or low-profile basket may all require different metal thicknesses and different stone positions. Small changes at this stage can affect comfort, durability and the final visual style.
For a pear or teardrop centre stone, CAD is especially useful for checking the pointed tip, the curve of the rounded end and the position of a V-prong if one is used. The setting should secure the stone without making the design look heavy or hiding too much of the outline.
Custom Design ProcessProng placement
CAD shows where the claws will sit around the stone and whether they look balanced from the top. The final prongs are still shaped and finished by the setter.
Setting height
The model can show whether the ring sits low, medium or high. This affects comfort, visibility, wedding band fit and how prominent the centre stone appears.
Direction, Orientation and Asymmetry in CAD
Some designs require the stone or design elements to face a particular way. CAD helps clarify this before production, especially when a centre stone has an obvious orientation. For a pear or teardrop shape, the point direction changes the mood of the ring and should be confirmed clearly in the CAD review.
Point direction must be confirmed
A pear stone may be set with the pointed tip facing toward the fingertip or toward the hand. The choice affects the ring’s visual flow and should not be left ambiguous.
Asymmetrical designs need extra checking
If the ring has offset stones, flowing shoulders or an angled centre stone, CAD should be reviewed from several views to make sure the design looks intentional.
Practical orientation matters
The orientation of a shaped stone can affect protection, prong position and comfort. The CAD stage allows these decisions to be made before metalwork begins.
How Metal Choice Is Represented in CAD
CAD can be rendered in white, yellow, rose or platinum-like tones, but the screen colour is only an approximation. Real metal has depth, reflection, polish and warmth that depend on alloy, lighting and finishing. The CAD model helps you assess form and contrast, while the final metal choice should be made with practical wear and aesthetic preference in mind.
Platinum and white gold
CAD can show a cool white metal appearance, but it cannot fully show the difference between platinum’s natural tone and rhodium-plated white gold.
Yellow gold
Yellow gold renders help visualise warmth and contrast, especially around white diamonds, but real yellow gold may appear richer or softer depending on lighting.
Rose gold
Rose gold can look more saturated on screen than it does on the hand. CAD is helpful for visualising romance and warmth, but samples or previous work can guide expectations.
Lab-Grown and Mined Stones in the CAD Process
The CAD process is similar whether the centre stone is lab-grown or mined, but the actual stone measurements remain essential. CAD should be built around the chosen diamond or gemstone whenever possible, because certificate dimensions, shape outline and depth can affect setting design. The origin of the stone matters less to CAD than the stone’s physical measurements and visual character.
Measurements are more important than origin
A lab-grown and a mined diamond of the same carat weight may have different dimensions. CAD should use the actual length, width and depth.
Stone personality still needs review
The CAD model cannot tell you whether a specific stone has the brightness, contrast pattern or bow-tie appearance you prefer. That should be checked separately.
Budget can affect design choices
Choosing lab-grown or mined may influence available stone size, which then affects band width, halo scale, setting height and overall CAD proportions.
Common CAD Review Mistakes to Avoid
Many clients approve CAD too quickly because the render looks polished and exciting. A better review looks carefully at measurements, comfort, practicality and whether the model matches the design brief. CAD is the best stage to correct proportion problems, but it is not the best stage to ignore technical details.
Judging only from a close-up render
CAD images are usually magnified. Always ask for measurements or a sense of scale so tiny details are not overestimated.
Ignoring the side profile
A ring may look perfect from above but sit too high or feel bulky from the side. Review the profile carefully before approval.
Forgetting wedding band fit
If a future wedding band is important, ask how the engagement ring profile may affect stacking or whether a shaped band may be needed.
Expecting the render to match reality exactly
The final ring will have hand-finished prongs, real metal reflection and a real stone. CAD is a highly useful preview, not a photograph of the finished piece.
How to Review Your Custom Ring CAD Before Approval
Before approving a CAD model, review it with both emotion and practicality. Ask whether it still feels like the ring you wanted, whether the proportions suit the chosen stone, and whether the jeweller has explained any technical compromises. Good CAD approval is a shared decision between client preference and professional jewellery construction.
Check the design against your brief
Compare the CAD to the original design direction. Confirm the overall style, stone arrangement, setting type, band profile and any personal details.
Ask about what may change in finishing
Prongs may be refined, edges softened and surfaces polished after casting. Ask which details are structural and which will be improved by hand finishing.
Confirm revision expectations
Small CAD revisions are normal, especially for proportion, height or detail placement. Larger redesigns may affect timing or cost, so clarify before production continues.
Approve only when the main decisions are clear
Once CAD is approved, it usually becomes the production basis. Make sure stone orientation, dimensions, metal choice and setting style are all confirmed.
What Happens During a Custom Ring Cad Process FAQ
What is CAD in a custom ring process?
CAD stands for computer aided design. In a custom ring process, it is the digital model used to show the ring’s proportions, stone placement, setting height, band width and main construction details before production.
Is the CAD render exactly what my finished ring will look like?
No. CAD is a technical and visual preview, not the final real-life ring. The finished piece will depend on casting, stone setting, polishing, metal reflection and hand finishing.
Can I request changes after seeing the CAD?
Yes, CAD is commonly reviewed and revised before approval. Typical revisions include adjusting stone size appearance, band width, setting height, prong placement or design details.
Can CAD show how much a diamond will sparkle?
CAD can show placement and openness, but it cannot accurately show true diamond sparkle. Brilliance depends on the actual stone, cut quality and lighting.
Why do actual stone measurements matter for CAD?
Actual measurements allow the CAD model to fit the chosen stone properly. Carat weight alone is not enough because stones of the same weight can have different length, width and depth.
How is a pear or teardrop stone handled in CAD?
The CAD should confirm the stone outline, length-to-width ratio, point direction, pointed tip protection and whether a V-prong or another protective setting detail is appropriate.
Can CAD show a bow-tie in a diamond?
Not reliably. A bow-tie is an optical feature of the actual stone and should be assessed through stone images, videos or in-person viewing rather than CAD alone.
What should I check before approving CAD?
Check the top view, side view, setting height, band width, stone orientation, prong placement, wedding band compatibility and whether the proportions match your design brief.
Does the metal colour in CAD show the exact final colour?
No. CAD metal colours are visual approximations. Real platinum, white gold, yellow gold and rose gold have different tones, reflections and finishes in natural light.
Ready to Review a Custom Ring Idea in CAD?
Send OgilvieGems your design direction, preferred stone details and budget. We will help you understand what can be modelled, what needs technical refinement and what to expect before approval.
Request A Custom Quote